The Current Floor Rotation is: Thursday
The floors will rotate in 18 hours and 12 minutes. (Click to update)
The Tower of Barbs is a mysterious ever-changing tower on the island of southwestern Tokyo. It serves as the main setting of Let It Die; the ultimate goal of the game is to reach the top. There are various paths you can take, which lead you to different areas on the floors. Paths are indicated on the map by colored lines, which correspond to the color of the escalator the player must use to travel to the desired area.
There's a main elevator shaft that travels from the Waiting Room to the top of the Tower of Barbs, as well as a few side elevators, though these tend to have only two or three stops. The more floors you wish to travel past in an elevator, the more Kill Coins it costs. Not all areas will have their own stop on the main elevator and at times the player may need to travel through several side areas before reaching the next elevator stop.
Completion of many of the side areas is optional, but the resources the player can gather during exploration may prove vital to further advancement in the Tower. The game currently has up to 351 floors to explore after entering Tengoku. A note will be received by Uncle Death after reaching the 201th and 351st floor.
Rotations[ | ]
At 10:00 UTC every day, the layout of the tower and which areas are available changes. There are four different rotations that are cycled through repeatedly. Most of the centrally located areas exist in all rotations with some exceptions, though they may move around on the map as their connections change. For every rotation there are a number of areas that are only available during that rotation, which means that the player can only enter them one out of every four days. Some of these rotation-specific floors may have Stamps, pages from Tales From The Barbs, and pages of the Yotsuyama Bionics Catalogue.
For much more detailed information, go to this spreadsheet.
Tower Rotations:

Monday
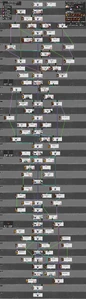
Tuesday / Saturday

Wednesday / Sunday

Thursday
Friday


Districts[ | ]
The Tower of Barbs is split up into 4 Districts, each focusing on a different type of damage and defense. Usually enemies are defended against the weapon types they carry, so if a District focuses on Slashing weapons, they're generally wearing armor that protects against Slashing damage. It can be a good idea to tailor your weapons and armor to the district you are currently going through.
Max's District - D.O.D. ARMS (Floors 1-10)[ | ]
In this District, enemies primarily use Slashing and Blunt weapons. While Fireworks Launchers have some Fire damage, generally you don't specifically have to armor against it. You may occasionally find Fire-based traps as well, but these can be easily avoided.
D.O.D. ARMS armor tends to be weak to physical damage (Slashing, Blunt, Piercing) and strong against elemental damage (Fire, Electric, Poison).Jackson's District - War Ensemble (Floors 11-20)[ | ]
In this District, enemies primarily use Slashing and Piercing weapons. Be very careful during your first few runs, since you'll still be wearing D.O.D. ARMS armor.
War Ensemble armor tends to be weak to Slashing and Electric damage and strong against Piercing, Fire, and Poison damage.Crowley's District - Candle Wolf (Floors 21-30)[ | ]
In this District, enemies primarily use Slashing and Piercing weapons. You'll also see some Fire and Poison damage.
Candle Wolf armor is usually weak to Blunt, Piercing, and Electric damage and strong against Slashing and Poison damage.Taro's District - M.I.L.K. (Floors 31-40)[ | ]
In this District, enemies primarily use Blunt and Piercing weapons. You'll also see some Electric weapons here.
M.I.L.K. armor is usually weak to Slashing, Fire and Poison damage and strong against Blunt damage.| Floor | Area | Rotation | Materials | Notable Features | Boss | Collectibles |
|---|---|---|---|---|---|---|
| 31F | All Materials | Stamp Machine 31F | ||||
| Koi | None | Guaranteed chance for | ||||
| 32F | Katsuma | Mid-Boss: U-10 | Stamp Machine 32F | |||
| Koshi-Yama | Chance for Gold Chest | |||||
| Osuki | ||||||
| Shirokin | None | 44ce Boss: Pale Wind (Normal) | ||||
| 33F | All Materials | |||||
| Uchinobu | ||||||
| Miraigaoka | ||||||
| Kurome | ||||||
| None | Stamp Machine 33F | |||||
| Akabadai | ||||||
| 34F | Nitanda | None | Mid-Boss: Coen | Stamp Machine 34F | ||
| Sengoku | ||||||
| Azaba | ||||||
| Nagazaka | ||||||
| None | Guaranteed chance for | |||||
| Otani-Yama | ||||||
| 35F | Shina-Yama | Tales From the Barbs Vol. 4, Pg. 1 | ||||
| Wakaba | Guaranteed Gold Chest | Stamp Machine 35F Yotsuyama Bionics Catalogue Pg. 7 | ||||
| Nakaeda | All Materials | |||||
| Komada | Guaranteed chance for | |||||
| Dainoba | None | 44ce Boss: Pale Wind (Hard) | ||||
| 36F | All Materials | Stamp Machine 36F Yotsuyama Bionics Catalogue Pg. 8 | ||||
| Hiranuma | ||||||
| Itanodai | Mid-Boss: GOTO-9 | Tales From the Barbs Vol. 4, Pg. 2 | ||||
| Momonoki-Zaka | ||||||
| 37F | All Materials | Tales From the Barbs Vol. 4, Pg. 3 | ||||
| Mitsuba | ||||||
| Konagi | ||||||
| Moguro | Stamp Machine 37F | |||||
| 38F | Ebata | Mid-Boss: Jin-Die | Tales From the Barbs Vol. 4, Pg. 4 | |||
| Yataka-Cho | Chance for Gold Chest | |||||
| Himokawa | ||||||
| Jiyu-Toge | Stamp Machine 38F | |||||
| Ibakoen | ||||||
| Ibamura | ||||||
| None | ||||||
| Takanowa | None | 44ce Boss: Pale Wind (Nightmare) | ||||
| 39F | ||||||
| Haratsuka | Tales From the Barbs Vol. 4, Pg. 5 | |||||
| Stamp Machine 39F | ||||||
| 40F | None | Don Boss: Taro Gunkanyama | Boss Stamp 40F Tales From the Barbs Vol. 4, Pg. 6 | |||
Beyond The 40th Floor[ | ]
In this area; all enemies are haters, there might be a special challenge, there's NO elevators, the player is also restricted to a limit of utilizing 5 items (Express pass users can use up to 7 items).
Something to note is that from this area onward, all floors are randomly generated, meaning each floor changes every time; it can be any floor from any district, however the only visual effect that distinguishes this area is the intense red tint.
Once this area is entered, there's no coming back (through the entrance mind you). The only ways to get out of this area is by utilizing a Tryptamine D or by a special floor, and of course, by dying. (Salvage cost is 250,000 Kill Coins)
Tengoku[ | ]
TENGOKU is an endless floor entered through TENGOKUMON. This floor has a difficulty level which gradually increases as the player passes through each floor. The player will encounter better and better tier materials as they progress through the endless floor. Likewise, they will find tougher enemies to challenge in the upper levels.
Just like floors 42 to 50, all of the enemies found in TENGOKU are haters.
All of the enemies of TENGOKU drop Bloodnium, 3 for red named haters and 1 for regular haters.
At the floors which are multiples of 5 after 50 (ie. 55,60,65,etc.) the player will encounter a challenge floor with a set treasure at the end.| Floor | Area | Rotation | Materials | Notable Features | Boss | Collectibles |
|---|---|---|---|---|---|---|
| 41F | None | |||||
| Chojo | None | |||||
| 51F | None | |||||