No edit summary Tag: Visual edit: Switched |
mNo edit summary Tag: Visual edit |
||
| Line 21: | Line 21: | ||
== Connecting Areas == |
== Connecting Areas == |
||
* [[Waiting Room]] |
* [[Waiting Room]] |
||
| − | * [[Imokawa-cho - 2F| |
+ | * 2F [[Imokawa-cho - 2F|Imokawa-Cho]] |
| − | * [[Wanoki-2f| |
+ | * 2F [[Wanoki-2f|Wanoki]] - locked until [[COEN]] on [[Tamata - 3F|3F Tamata]] is defeated. |
{{DEFAULTSORT:01F}} |
{{DEFAULTSORT:01F}} |
||
Revision as of 15:55, 23 April 2021

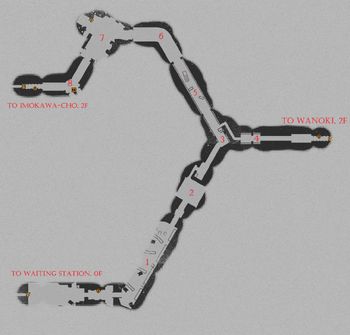
Map of Ikegara district, 1F. (Waiting Station should be Waiting Room, sorry!)
Welcome to Ikegara, an area on Floor 1 of the Tower of Barbs!
Ikegara lies along the main elevator shaft and appears during all rotations. It contains the first Stamp Terminal.
Ikegara spawns no materials.
Overview
It is good to note that the map may not always look like this as the Tower of Barbs is always changing!
After your first inevitably short lived run, you return from the Waiting Room to start a second foray into the Tower. The following map should be provide some insight on where you can find enemies, mushrooms, and materials, as well as the stamp terminal for the 1st Floor.
- Contains spawn points for two Frogs, two red chests, and two mushrooms.
- Always contains two Scratch Tubers and two frogs.
- Directly on your right as you enter the long tunnel is the stamp terminal. Be careful, as a Screamer is going to be on your left. Possibly a prize box in the vicinity of the stamp terminal. Continuing towards 5, you will encounter another Scratch Tuber. Directly behind the box on the right is a Screamer, and the pathway to 4.
- Directly ahead on this path is one Screamer, and if you turn to look back from the escalator to Wanoki district you'll see a prize box to the left of the narrow path back to 3. Note, you must defeat COEN before traveling to Wanoki, as you can't open the gate before then.
- Screamer hides here. It's also a favorite spot for Haters to hide out and try to ambush you.
- There's a frog in the puddle, however be careful as once you pass the bend a Screamer will drop down onto the hill in the middle and rush you from behind. A Scratch Tuber will also see you from the entrance to 7 and begin to walk towards you, but they're slow, so its no worry.
- 3 Screamers and a Scratch Tuber in a giant open area. The 3 Screamers can take you down fast if you're not over leveled, so be careful. Running around them and try kiting them into hitting each other and you should be good. There are two breakable boxes, one to the right of an openable gate which allows access to a prize box, and the other is besides the entrance to the room from 6.
- Elevators
Connecting Areas
- Waiting Room
- 2F Imokawa-Cho
- 2F Wanoki - locked until COEN on 3F Tamata is defeated.
